Pages

Thursday, April 26, 2012

More Progress With the Paper Garment

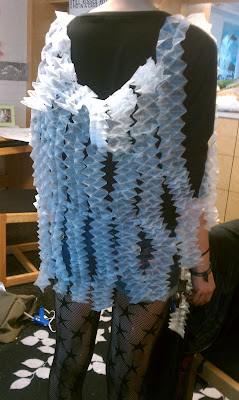
Iv'e started attaching all the strips that I've made so far and I've been trying it on my model, Skye! Thanks for helping me Skye! Here are some pictures:   


The main problem that I am working on fixing is attaching the strips, so far I've been using small pieces of tracing paper and hot glue and it has been working pretty well (except for the burns I've been getting on my fingers...) I think I need to add more of these links in order to strengthen the wax paper which is stretching more and more. There are also gaps that need to be brought together. This has changed from y original design but hopefully it will come together just as nicely!

Also check out this fabulous dress also inspired by cocoons:

Hand Crocheted and designed by isabella Lundberg 

Wednesday, April 25, 2012

Picture Time! Progress, slow slow progress

Here are some pictures of my progress, it may not look like much but it will come together quickly! It's just all the small detail orientated preparations that I've been having to do first. These are some of the mock ups for the shape of my cocoon.  It will like a long shaw with a hood of some sort. my plan is to have three sections that run diagonal around the body, like this one:


This was the first version of the hood, but this is not the pattern that I will be using, in the end the hood will be a series of connected hoops. This hood is too stiff and structured, and reminds me too much of an astronaut! It also does not connect well with the body of the piece. 


To make up the body of the piece I am folding long strips of  wax paper to look the the one below:


Here they are compressed, they sort of look like butterflies!


These are in the folding process. Look up Origami Tessellations for some amazing art using similar techniques!


In the end its a lot of work and is kind of slow but I'm confident the result is going to be awesome!

Inspired By Nature

I Our final assignment in 3d class is to make one of three things: A paper toy, a paper lamp or a art to wear piece completely made out of paper. I chose to challenge myself and do something I would probably never choose to do outside of class. I chose to make an art to wear piece! It reminds me of the challenges on Project Runway.

Project Runway: Paper challenge
At first my idea was to make a jacket out of tracing paper and old record covers. My professor encouraged me to think more abstractly and more concept based though and now I am going a completely   new direction with my garment, its not going to be as functional. My teacher told me to research words like body-covering, shelter and protection, to get a different perspective on art to wear. I researched and researched and finally came up with a concept I love. Cocoons! Butterfly cocoons fascinate me, they are not only beautiful but mysterious as they hide the transformation going on inside it. They also provide support and protection for the butterfly for a small amount of time, but to us they are very fragile. I want mimic these attributes in my art to wear piece. Here are some pictures for inspiration:


Aren't they just fascinating? 

Monday, March 12, 2012

Part Two: Serial Plains

After making some rather simple designs out of paper the third an final design was to be made of foam board and the requirements were a little more demanding of my creativity. I really enjoyed thinking up inspiration for my design which was gears. The requirements for this assignment were the plains stood vertically instead of horizontally and that while growing larger the original shape transformed into another shape, like metamorphosis! My first shape isn't really a gear shape at all, but merely a simple hollow quarter circle. Gradually I expanded it and added pegs to create more and more complicated gears.


 Here are all my pieces cut out! it was a tad difficult but worth it! 


I love how it looks spaced apart and standing horizontally. I think it almost looks like tree branches or a pine cone.


This project is great inspiration for creating more complicated and abstract sculptures. Before I was very intimidated, but now working with simple materials and within specific guidelines I can turn my inspiration into a physical work of art! 

Wednesday, February 29, 2012

Sneak Preview!

Here's a sneak preview of what the final project for class will be, I spotted it just walking down the street! 


Tuesday, February 21, 2012

Second Project: Part One


This is where we get into serial plains (like at the mall)! And organic shapes (which are more fun to draw than other shapes)! You could also refer to them as biomorphic shapes, referring to shapes occurring in nature. Our assignment was to create two small (6in X 6in) models using paper and foam board bits for spacers, layered to create serial plains and imitate volume with flat surfaces. Both had different requirements. The first was a free standing organic shape, using only curves, we drew out ourselves. The shape had to rise up from the base going from large to small. 

We used three of each shape to create height. 


The second also was an organic shape but  it also had to incorperate two straight edges to create a right angle. While it did rise up from the base (vertically) and went from large to small we were challenged to make the shape slowly morph into another similar shape (or not so similar). 


My shape kind of looks like a whale I think.

This all leads up to the second part of the project, which is full size (1ft by 1ft) and made completely out of foam board! It was quite a bit more complicated...

Sunday, February 19, 2012

My First Project and First Challenges


With my first assignment I was ripped, roaring, and ready (I’m not sure I got that right). My creative juices were ready to flow! Our teacher gave us a great presentation on modern relief sculpture, with loads of pictures! Here were some of my favorites:
by Jeff Nishinaka  
More of his work on Today Tomorrow: http://www.todaytomorrow.net/2010/10/12/jeff-nishinaka/
Counter Cosmo by Jen Stark  
 Check out her website for more amazing sculptures: Jenstark.com

Our assignment was to create a modular relief sculpture mimicking fabric or a wall covering made out of basic white index cards. We could cut them, fold them, crumple them up...anything to make an interesting shape with elements of 3D sculpture, while still being intended to lay flat. The shape also needed to be repeated over and over, with the possibility of changing slightly. I did extensive research finding shapes I liked: 
Yes that's the Star Trek logo...
And made quite a few experimental shapes:
These are the good ones


And finally perfected one could work with:
My brainstorming process its really messy. To prove it here’s my sketches: 
I don't always sketch in red...
I was thinking radial and expanding but upon construction and connection I found the shape made didn’t fit in the way I had expected to. It make the shapes pile up instead of lie flat, the problem was that my links were all about the same size but the sides I was connected were not the same length. I changed my design to be more logical and less complicated. It ended up looking like a repeating pattern of stars or snowflakes.


Cutting and folding lots of index cards


Punching holes for the links 


Connecting and slowly adding

Making links out of gold paper clips (they were on sale at Staples, use whatever you can get!) It was real torture on my fingers...
The end result! Just under two yards by two yards. It casted great shadows when hung on the wall! 

My First Post: Inspiration


A note: As this blog gets started up there is going to be a lot of posts, posted all at once, that are not exactly current, but it’s just that I’m trying to catch up to our current project because I didn’t start this blog at the very beginning of this semester. Also the bulk of the photos are from my phone. (I’m not a photography major). 
My first post is just an introduction to this blog and some of the inspiration I found, even before I came to class. Please take the time to read the brief About page, it explains the blog pretty well. I’m in the second semester of my first year of college. For all freshmen at Moore the first year is foundation year, we all basically take the same classes. The first semester I took 2D design and this semester I’m taking 3D design. A basic overview of the class: Learning the basics of design as they pertain to 3-dimentional form and applying it with various techniques. My teacher’s motto: Stay hip, stay young, stay current. So we’re always looking for inspiration, no matter where we are. Its not too difficult to find in Philadelphia though! Over winter break I went to The King of Prussia Mall, at the time I just thought the ceiling looked cool. 


Little did I know this was an excellent example of serial plains! 
A skylight with geometric shapes:

Poof! With 3D terminology now they’re interconnected polygons. 
I’m beginning to think that with this class along with Art History I’m being brainwashed...